Have you seen the 'Search Form Builder' feature in our free Template Assistant Add On?
Quickly drag, drop and configure the fields shown in search forms with no PHP required.
Editing the layout of the search form, or amending the fields shown, is likely to be one of the first things you do when integrating Property Hive. If you'd prefer to edit the search form from within code as opposed to using our Template Assistant add on, in this guide we'll be looking at how you can do exactly that.
Targeting a Form
The Default Fields
Adding, Editing and Removing Fields
Displaying Price/Rent Dropdowns in Different Currencies
Targeting a Form
The first thing to understand is that each form has a unique identifier. The reason for this is that you might have different forms across the site using different layouts and/or different fields.
For example, a form on the homepage might have just a 'Location' search box, you might have a small form in a sidebar somewhere on your site, and of course you'll have the full-blown form on the property search results page.
Search results form - The form included by default at the top of the search results page has an identifier of 'default'.
Forms added by shortcode - You can include search forms anywhere on your website by using the following shortcode:
[property_search_form]
In this scenario the form will be given an identifier of 'shortcode' unless you overwrite it like so:
[property_search_form id='mysearchform']
This is great because, by passing in a different ID we can then have an unlimited number of forms across the site with no restriction or conflicts.
We'll use this identifier further down when it comes to modifying the fields.
The Default Fields
Let's take a look at the fields shown by default in a search form prior to us making any amendments:
Department - Allows you to choose 'Sales', 'Lettings' or 'Commercial'. This is dependable upon which departments are activated in the Property Hive settings. If you deactivate lettings, then 'Lettings' will automatically be removed as an option on the form(s). This field also takes into the account the 'Primary Department' set in Property Hive settings.
When the user chooses a different department, the fields below update automatically to show relevant price, rent and area amounts.
Minimum Price/Rent - A dropdown of sales prices or letting rents. Sales prices range from £100,000 to £1,000,000 and letting rents range from £500 PCM to £2,000 PCM.
Maximum Price/Rent - A dropdown of sales prices or letting rents. Sales prices range from £100,000 to £1,000,000 and letting rents range from £500 PCM to £2,000 PCM.
Minimum Bedrooms - A dropdown of bedrooms ranging from 1 to 5.
Minimum Floor Area - If commercial is chosen as the department this will display containing a dropdown to choose the minimum floor area.
Maximum Floor Area - If commercial is chosen as the department this will display containing a dropdown to choose the maximum floor area.
Property Type - A list of the property types configured in the 'Custom Fields' section of Property Hive settings.
Adding, Editing and Removing Fields
Modifying the fields shown on a search form is easy through the use of WordPress filters. We'd normally do this in our theme's functions.php file. Let's look at a very basic example of this:
// Note we're using 'default' as the identifier. Update this accordingly (see the first part of this guide)
add_filter( 'propertyhive_search_form_fields_default', 'edit_default_property_search_form_fields' );

function edit_default_property_search_form_fields($fields)
{
    // This is where we'll modify the fields
    // To see a full list of the default fields and their attributes try var_dump($fields);

    return $fields; // return the fields
}
So here we're adding a filter to 'propertyhive_search_form_fields_default' (where 'default' is the name of our identifier) and we're passing the fields through our own function called 'edit_default_property_search_form_fields'. We could name this second function whatever we like.
Adding Fields
Now we have the basic structure in place, let's first look at how we would add a field. Building on the code above, we'll add a location search box:
// Note we're using 'default' as the identifier. Update this accordingly (see the first part of this guide)
add_filter( 'propertyhive_search_form_fields_default', 'edit_default_property_search_form_fields' );

function edit_default_property_search_form_fields($fields)
{
    // Add a location search field
    $fields['address_keyword'] = array(
        'type' => 'text',
        'label' => 'Area'
    );

    return $fields; // return the fields
}
Here we're adding a new field with the key 'address_keyword' (this is the word Property Hive uses to know it should search the address), we're then adding a type of 'text' and a label of 'Area'.
There are a number of field types we can use (checkboxes, hidden fields, dropdowns etc) and each support a variety of attributes (whether to show the label, placeholders etc). Too many to list here in fact so take a look at the code at the link below see a full list of these:
Editing Existing Fields
There are a number of reasons why you might want to modify existing fields; changing the label, adding a placeholder, changing the dropdown options, and more. Lets begin with the skeleton code above and look at modifying a few of the fields:
// Note we're using 'default' as the identifier. Update this accordingly (see the first part of this guide)
add_filter( 'propertyhive_search_form_fields_default', 'edit_default_property_search_form_fields' );

function edit_default_property_search_form_fields($fields)
{
    // Change the minimum bedroom options
    $fields['minimum_bedrooms']['options'] = array( '' => 'Any', 1 => 1, 2 => 2, 3 => 3, 4 => 4, 5 => 5, 6 => 6);

    // Don't show a label for maximum price
    $fields['maximum_price']['show_label'] = false;

    // Change the label for minimum price
    $fields['minimum_price']['label'] = 'Minimum Budget';

    return $fields; // return the fields
}
Removing Existing Fields
Removing existing fields from the search form couldn't be easier:
// Note we're using 'default' as the identifier. Update this accordingly (see the first part of this guide)
add_filter( 'propertyhive_search_form_fields_default', 'edit_default_property_search_form_fields' );

function edit_default_property_search_form_fields($fields)
{
    // Remove the minimum bedrooms dropdown
    unset($fields['minimum_bedrooms']);

    return $fields; // return the fields
}
Simply unset the field and it will disappear from the form.
Reordering Fields
You might not always want the fields to be shown in the order they come out at, especially in the case where you're adding new fields as they'll be automatically placed at the end. Here we're into array manipulation using built-in PHP functions. It really depends on your individual requirements, however the example below shows how to add a location search box, then put it second in the list of fields after department:
// Note we're using 'default' as the identifier. Update this accordingly (see the first part of this guide)
add_filter( 'propertyhive_search_form_fields_default', 'edit_default_property_search_form_fields', 10, 1 );
function edit_default_property_search_form_fields($fields)
{
    // Assign the department field to a variable so we can reassign it later on
    $department_field = $fields['department'];

    // Remove the department field like
    unset( $fields['department'] );

    // Flip the order of the fields (we'll flip it back further down)
    $fields = array_reverse($fields, true);

    // Add our new field
    $fields['address_keyword'] = array(
        'type' => 'text',
        'label' => 'Area'
    );

    // Put our department field back into the array of fields after we removed it up above.
    $fields['department'] = $department_field;

    // Flip the order of the fields back to how they were before
    $fields = array_reverse($fields, true);

    return $fields; // return the fields
}
That's one of the more complicated examples, but probably one of the most requested changes we get asked.
Displaying Rent Dropdowns in Different Frequencies
Step 1: Install our free Template Assistant Add On
Download and install our free Template Assistant Add On.
Step 2: Edit the form in question
Navigate to 'Property Hive > Settings > Template Assistant > Search Forms' and edit the search form in questions.
Step 3: Edit the rent dropdowns
Expand the rent dropdowns in question and you'll see the ability to customise the options shown. On the left is the value passed around by Property Hive and this must be a monthly figure. On the right is how it will be displayed to users in the dropdown.
As such, should you wish to display rent dropdowns with weekly frequencies, for example, your options might look something like so:
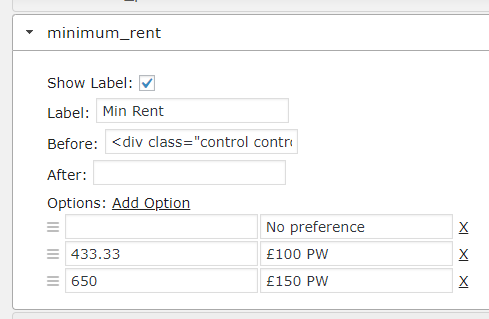
To convert weekly to monthly in the above scenario the formula used was as follows:
{monthly_amount} = ({weekly_amount} * 52) / 12
Displaying Price/Rent Dropdowns in Different Currencies
If dealing with a non-UK agency, it's likely you'll want to show the prices in the min/max dropdowns in a different currency. The prices are shown in sterling pounds by default, however can easily be amended.
Step 1: Set which currency search forms operate in
Navigate to 'Property Hive > Settings > General > International' and make sure you have the correct countries specified that you operate in. If you have countries selected which results in more than one currency, you'll be presented with a new option to specify the currency that search forms should be based on.
Step 2: Amend the currency symbol shown in dropdown values
Once the above has been set, we'll need update the price and rent dropdowns to show price labels in US Dollars as the default labels shown will be in GBP. Again, you can do this using our free Template Assistant add on, or by adding the following to our theme's functions.php file:
// Note we're using 'default' as the identifier. Update this accordingly (see the first part of this guide)
add_filter( 'propertyhive_search_form_fields_default', 'edit_default_property_search_form_fields', 10, 1 );
function edit_default_property_search_form_fields($fields)
{
    $ph_countries = new PH_Countries();

    // Residential Sales Price Dropdown Values
    $prices = array(
        '' => __( 'No preference', 'propertyhive' ),
        '100000' => '$100,000',
        '150000' => '$150,000',
        '300000' => '$200,000',
    );

    $fields['minimum_price']['options'] = $prices;

    $fields['maximum_price']['options'] = $prices;

    // Residential Lettings Rent Dropdown Values
    $prices = array(
        '' => __( 'No preference', 'propertyhive' ),
        '500' => '$500 PCM',
        '600' => '$600 PCM',
        '700' => '$750 PCM',
    );

    $fields['minimum_rent']['options'] = $prices;

    $fields['maximum_rent']['options'] = $prices;

    return $fields;
}
We've only used three options in the example above, however you can have as many as you like. Essentially on the right we're setting the value which is visible to the user to choose from, and on the left we're converting the price to GBP. We convert all prices to GBP in the backend when you create a property and use that as a base to perform more accurate searches. This is especially useful when dealing with multiple currencies.